[Summary]: How to move your Apple Music library to SD card? This article briefly introduces an easy and professional way for transferring Apple Music to an external SD card from Android or iOS devices.
How to transfer Apple Music library to external SD card? If the Apple Music app is installed on your Android device, downloading tracks from Apple Music to the Android SD card is a simple task. As long as you use an Android device with a microSD card slot, you can put all downloaded tracks into the SD card so that you can save a lot of storage space. However, iOS users are a little out of luck. iOS devices do not have a microSD card slot, and it seems that downloaded songs can only be saved in the internal storage of the device. If you plan to transfer Apple Music songs to SD card to free up memory space, here are all possible solutions to move Apple Music to SD card, suitable for all Android and iOS users.
CONTENTS
Part 1: Save Apple Music to SD Card (For Android Users)
Since Apple updated its Apple Music app for Android users, users can directly download Apple Music songs to a SD card from Android device. A song you download from Apple Music usually has a high quality of 256kbps, and the file size may exceed 10MB, saving Apple Music to the SD card is undoubtedly a boon for Android users. By doing this, you don’t have to worry about the problem of the internal storage space being full, and other applications will not malfunction as you have enough cache space. First, you have an Apple Music subscription account, and there is an SD card inserted into your Android device, and then follow the steps to move Apple Music library to your Android SD card:
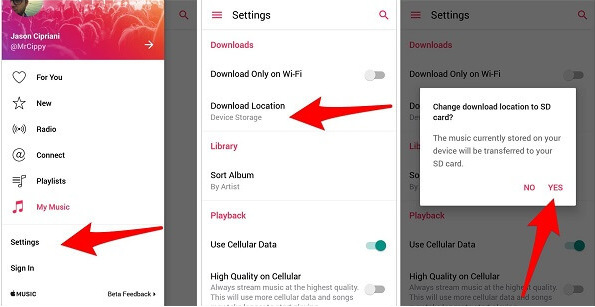
Step 1. Update Apple Music for Android app to the latest version.
Step 2. Launch it and tap on Menu > Settings.
Step 3. Find out the “Download Location” option under the “Download Only on Wi-Fi”.
Step 4. Click on YES to accept the prompt when asked if you want to change location to SD card.

In the next download, all Apple Music songs will be saved to your SD card by default until you change the settings again. What we know is that Apple Music, as one of the representatives of streaming music services, inserts DRM protection for all tracks and restricts us to only listen to Apple Music tracks on iTunes or Apple Music App. If you want to insert the SD card into other devices for playback or transfer Apple music to the SD card, it seems that you cannot do it yet for iOS users.
Part 2: Transfer Apple Music to SD Card (For Both iOS & Android Users)
iOS users may not support moving Apple Music to SD card directly. In this case, you may first consider using a third-party converter to remove DRM restriction of Apple Music. Apple Music Converter is an Apple Music DRM removal that can be used on Mac and Windows computers. The purpose is to help users enjoy digital media life more freely, including Android users and iOS users. It effectively removes DRM protection from Apple Music and converts music files from protected M4P to M4A, MP3, WAV, AAC, FLAC, etc. It not only guarantees the audio quality, but also ensures that it runs at the fastest speed, up to 16X faster. Now start to get high quality Apple Music MP3 files to transfer to external SD card easily.
- Remove DRM from Apple Music.
- Batch convert Apple Music to MP3, M4A, WAV, AAC, FLAC, etc.
- Keep ID3 tags, metadata info and original music quality in the output.
- Best iTunes Audio Converter, iTunes Audiobook Converter as well as Audible Converter.
- Convert Apple Music files at up to 16X faster speed.
- Easily move converted Apple Music songs to SD card, external storages or upload to Google Drive, Dropbox, etc.
- Fully compatilble with the latest Windows, macOS 10.15 Catalina and Music app.
Here’s How to Move Apple Music to SD Card Step-By-Step
Step 1. Add Apple Music Files to the Library
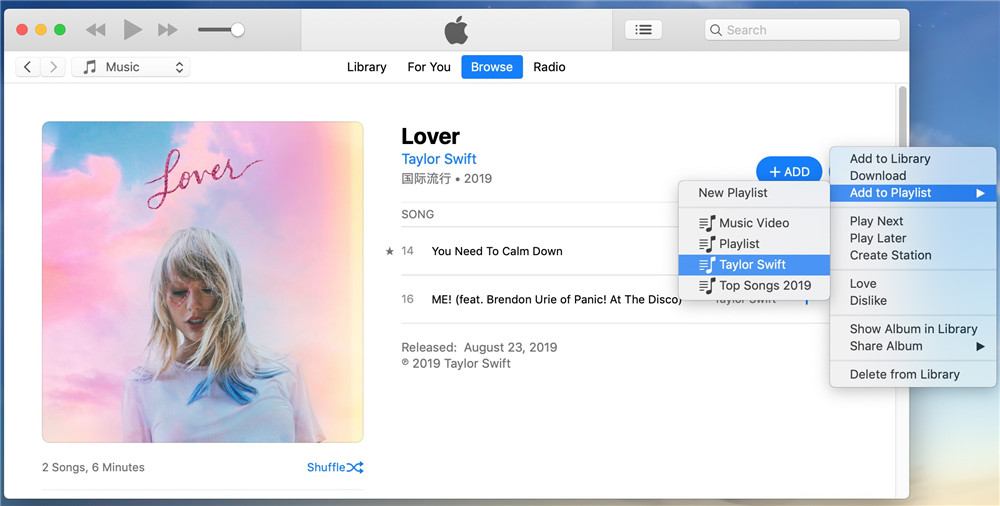
If you are using Windows or Mac 10.14 and earlier devices, please install iTunes on your computer and update to the latest version. Then add the Apple music files you need to convert to the iTunes library. For Mac 10.15 and later, you need to install the Apple Music app and add tracks or playlists to the Music library.

Step 2. Open Apple Music Converter and Selerct Songs
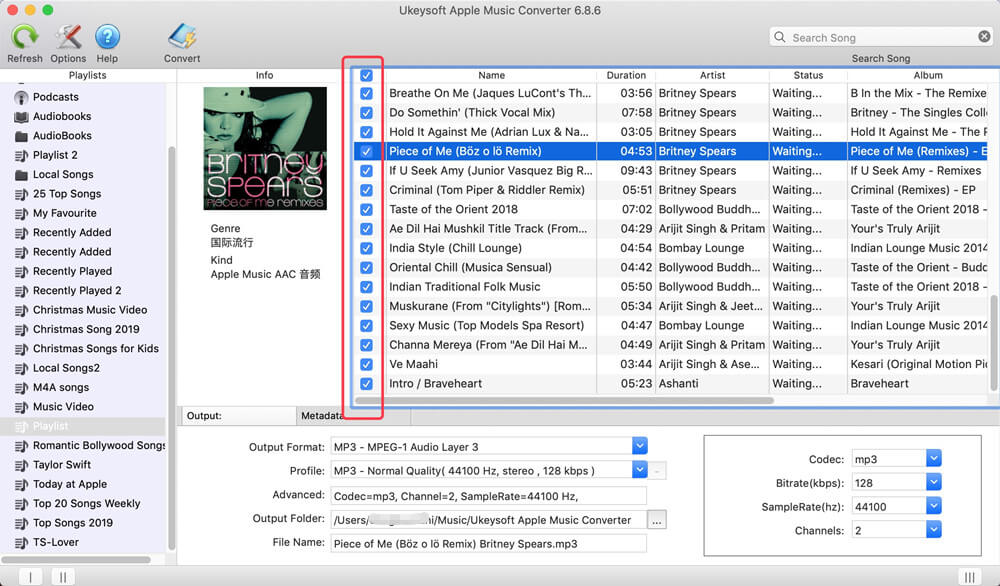
Install and open the converter on your computer. The interface of the converter is similar to that of iTunes and it will automatically load all the contents in the iTunes or Apple Music library. Next, tick the checkbox to select songs or playlist to move to SD card.

Step 3. Select MP3 as Output Format
Select MP3 as your output format in the bottom panel. You can also select other format like M4A, AAC, WAV, AC3, AIFF, AU, FLAC, M4R, and MKA. And you can set personalized output folder/quality/bitrate/samplerate/channels.

Step 4. Start Converting
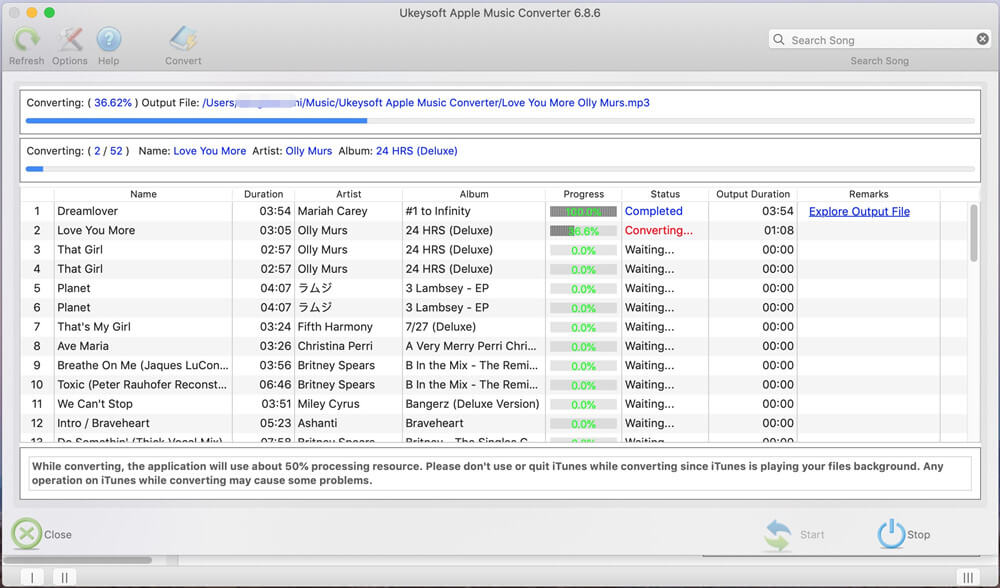
Click on Convert button to start convert selected Apple Music files to MP3 at up to 16X faster conversion speed.

Step 5. Transfer Converted Apple Music Songs to SD Card
Click on “Explore Output File” and the outout folder will be opened. Now Insert your SD card to the computer’s built-in SD card reader. Copy and paste all of converted Apple Music songs to your SD card directly.
Conclusion
Here are 2 possibilities to transfer Apple Music to SD card. Part 1 requires you to subscribe to the Apple Music service for $9.99/month. You don’t need any additional tool, but all downloaded Apple music tracks are protected by DRM and you cannot insert the SD card into other devices to play. Part 2 introduces the amazing features of Apple Music Converter and allows you to get rid of DRM from Apple Music. From then on, you can enjoy your favorite music on any device and any player. Even if you cancel your Apple Music subscription, these songs are still available. Now you can choose one of the methods to move Apple music to the SD card according to your needs to back up or free up phone space.

