[Summary]: How to transfer Apple Music to USB drive for listening in the car? The method provided in this article is how to transfer Apple music songs to an external USB drive so that you can play them on your home TV or car stereo as well as keep songs forever.
Since its release in 2015, Apple Music users have grown rapidly and spread all over the world. Users stream Apple Music songs on devices and players via iTunes or its Music app. However, you will find that it is impossible to transfer Apple Music songs to a USB flash drive. Because Apple uses a special encryption method to restrict users from using Apple Music freely, it is called DRM. Apple Music’s DRM lock prevents us from accessing Apple Music tracks on devices other than Apple’s authorization. To make matters worse, all downloaded Apple Music songs will be inaccessible if you cancel the subscription. In other words, you cannot keep Apple Music downloaded songs forever.
In fact, you can do more after transferring Apple Music to a USB flash drive, including playing Apple Music on the car radio, listening to Apple Music on your home TV, backing up Apple Music songs and saving them forever. You cannot copy Apple Music songs to a USB flash drive until DRM is removed. This article brings a solution to save Apple music to a USB drive, and everything is handed over to a professional Apple music converter.
Apple Music Converter is a trick to transfer Apple Music to USB flash drive, because it can not only help you bypass DRM from Apple Music, but also supports converting music files to DRM-free format with lossless audio quality and all ID3 tags (Track title, number, album, artist, etc.) kept. It supports up to 10 output formats such as AAC, MP3, M4A, FLAC, WAV and more. Once the DRM is removed, you can transfer Apple Music songs to a USB drive for backing up, and you can also listen to Apple Music in the car by inserting the USB drive.
Features of Apple Music Converter
- Convert Apple Music songs to MP3, AAC, FLAC or WAV without quality loss.
- Transfer Apple Music to USB flash drive, Android Tablets, PS4, iPod Nano/Shuffle, iPad, Sony Walkman, Xbox 360, etc.
- Keep ID3 tags for better organizing your music library.
- The conversion speed is up to 16X faster.
- Support converting Apple Music songs in batch.
- Best iTunes Audio Converter for Apple Music, iTunes M4P, Audible/iTunes Audiobook.
- Fully compatible with latest iTunes & Windows 10 & macOS 10.15 Catalina.
Complete Steps to Transfer Apple Music Songs to USB Drive
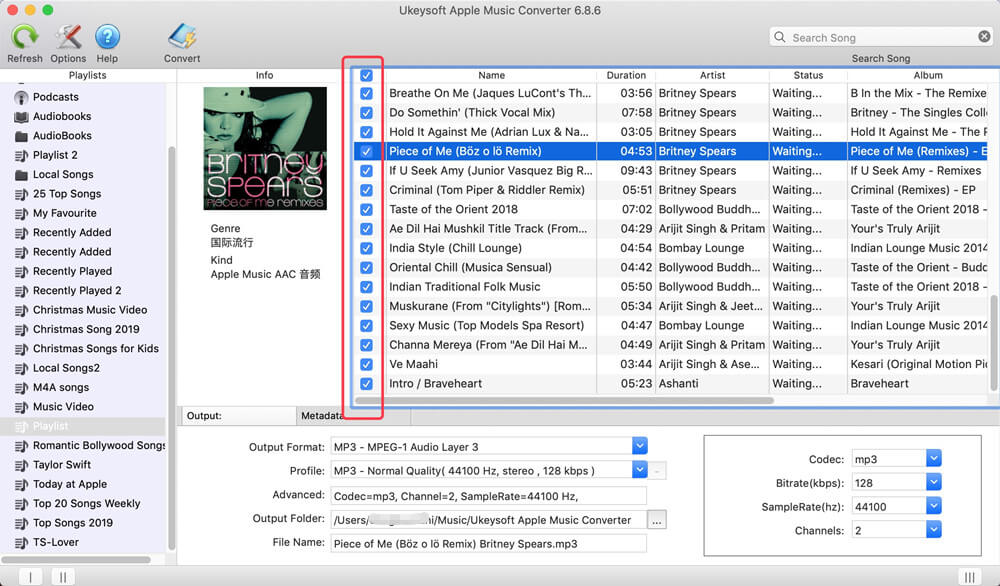
Step 1. Launch Apple Music Converter and Selerct Songs
The program is compatible with Windows and Mac. ITunes will also be opened when you start this Apple Music Converter on your computer. iTunes runs in the background until the conversion is complete. In “My Music” or “Playlist” section, browse and choose the track you want to transfer to USB drive.

Step 2. Select MP3 as Output Format
Currently the available output formats include MP3, M4A, AAC, WAV, AC3, AIFF, AU, FLAC, M4R, and MKA. To make the songs readable by most USB drives, you’d better set the output format as MP3.

Step 3. Start Converting
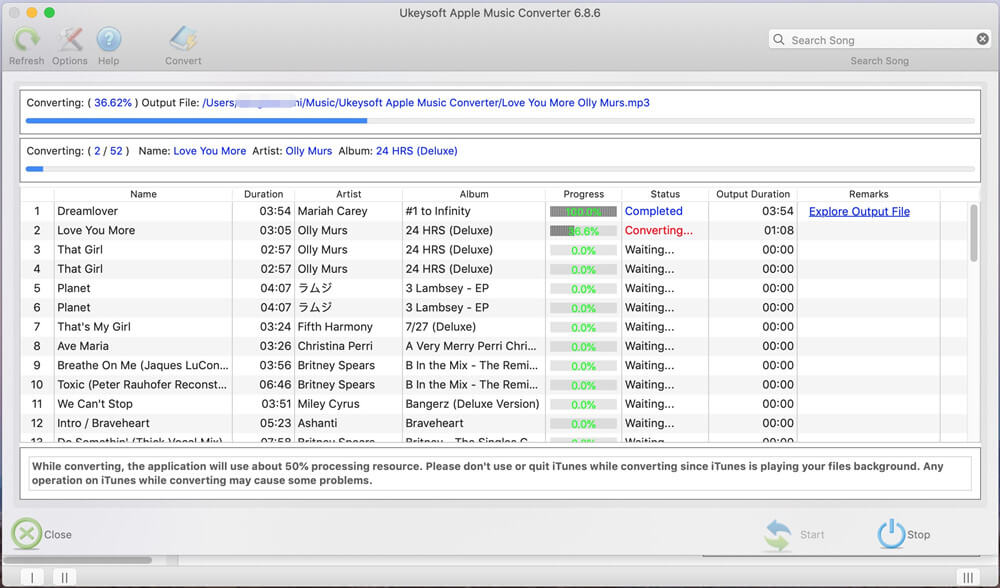
You can start converting selected Apple Music songs to DRM-free MP3 by clicking on the “Convert” button. When it is done, you can click “Explore Output File” icon to locate all the converted audio files.

Step 4. Transfer Converted Apple Music Songs to USB Drive
Now, insert your USB flash drive into your computer, and then drag the converted Apple Music files form the outout folder to your USB drive. Now you can play Apple music songs anywhere, such as at home TV or car audio.

